Storj Node Operator -Setup and monitor node use docker-compose / systemd
In this post, I'll share a guide to help you quick setup & run a new Storj Node to take take use free HDD space and you can make some money from it.
Important: This is not investment advise; hosting and running a Storj node is a personal choice, and each individual is fully accountable for that choice.
About revenue of Storj Node, you quick can check at my review here: https://vinguyen.blog/review-storj-node-operator-revenue-and-profit-2022/
I. What is Storj?
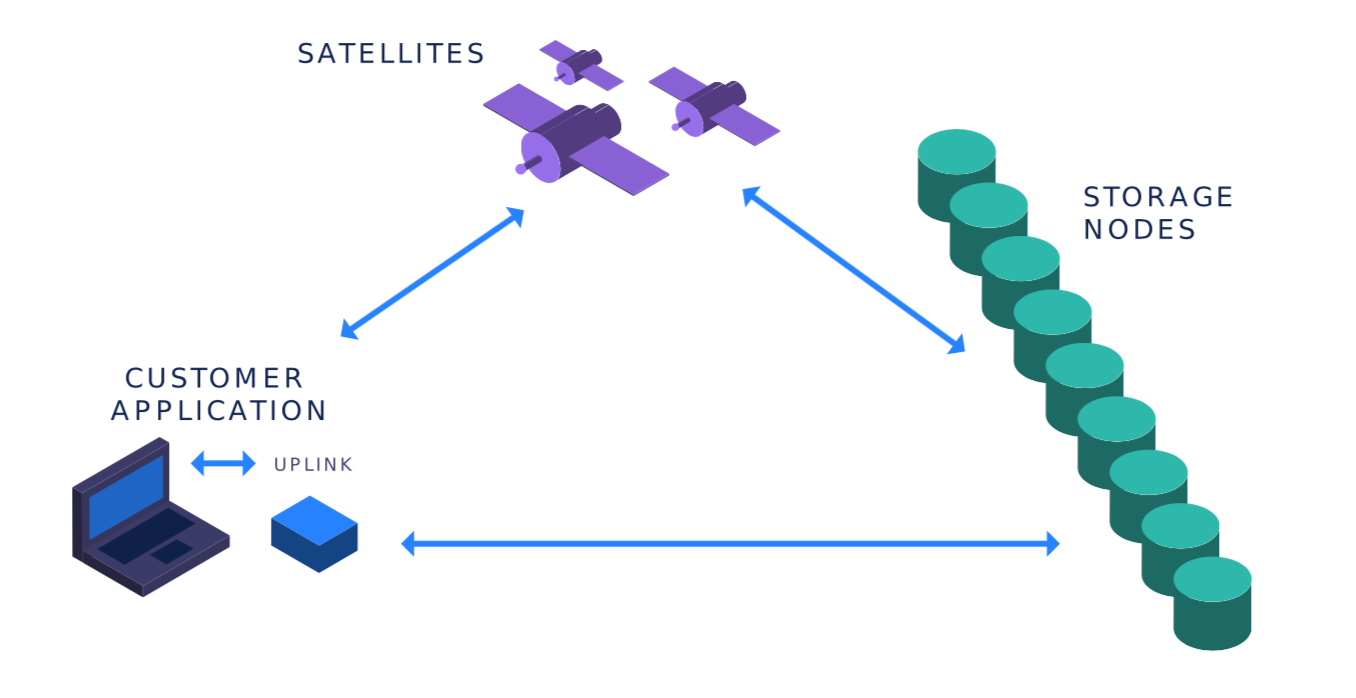
Storj is a decentralized cloud storage platform that uses a network of distributed nodes to store data. It is designed to be secure, scalable, and low-cost.
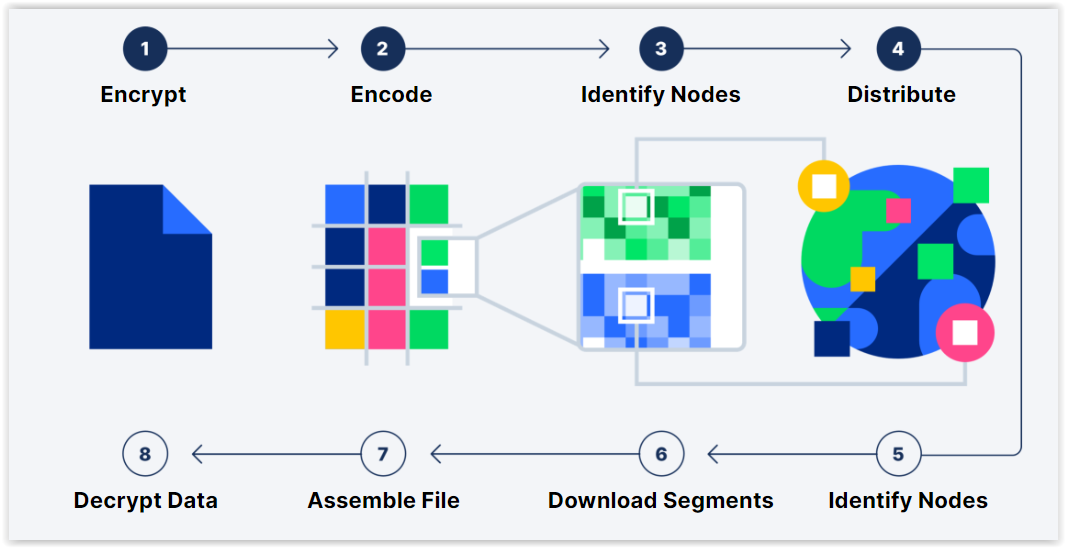
In the Storj network, users can rent out their spare disk space to store data for other users. The data is encrypted and divided into smaller pieces, called shards, which are distributed across the network and stored on multiple nodes. This decentralized approach to storage makes it more secure and resilient than traditional cloud storage platforms, which rely on a single centralized server or data center to store data.
For more information: https://www.storj.io
II. What is Storj Node?
A Storj node is a computer that participates in the Storj Network by storing data for other users. When a user uploads data to the Storj network, the data is encrypted and divided into smaller pieces, called shards, which are distributed and stored across multiple nodes.
1. How much does the Storj node get paid?
Storj nodes are paid based on the amount of data they store and the amount of bandwidth they use. The more data a node stores and the more bandwidth it uses, the more it will be paid.
Average Payout Per Month:
- Egress Bandwidth $20/TB
- Repair Egress Bandwidth $10/TB
- Disk Space $1.50/TB
- Audit Bandwidth $10/TB
The actual profit of some node that I summary for 2022: link
2. What is the minimum requirement to become a Storj Node Operator?
Source From: https://docs.storj.io/node/before-you-begin/prerequisites
Node uptime:
- Minimum uptime (online and operational) of 99.3% per month, max total downtime of 5 hours monthly
HDD:
- Minimum of 550 GB with no maximum of available space per node
Network
- Public IP or a publish domain setup use DDNS service (example: No-ip) with port 28967 open.
- Bandwidth: Minimum of 2 TB of bandwidth available per month with a public IP
III. Prepare Identity key to setup new node
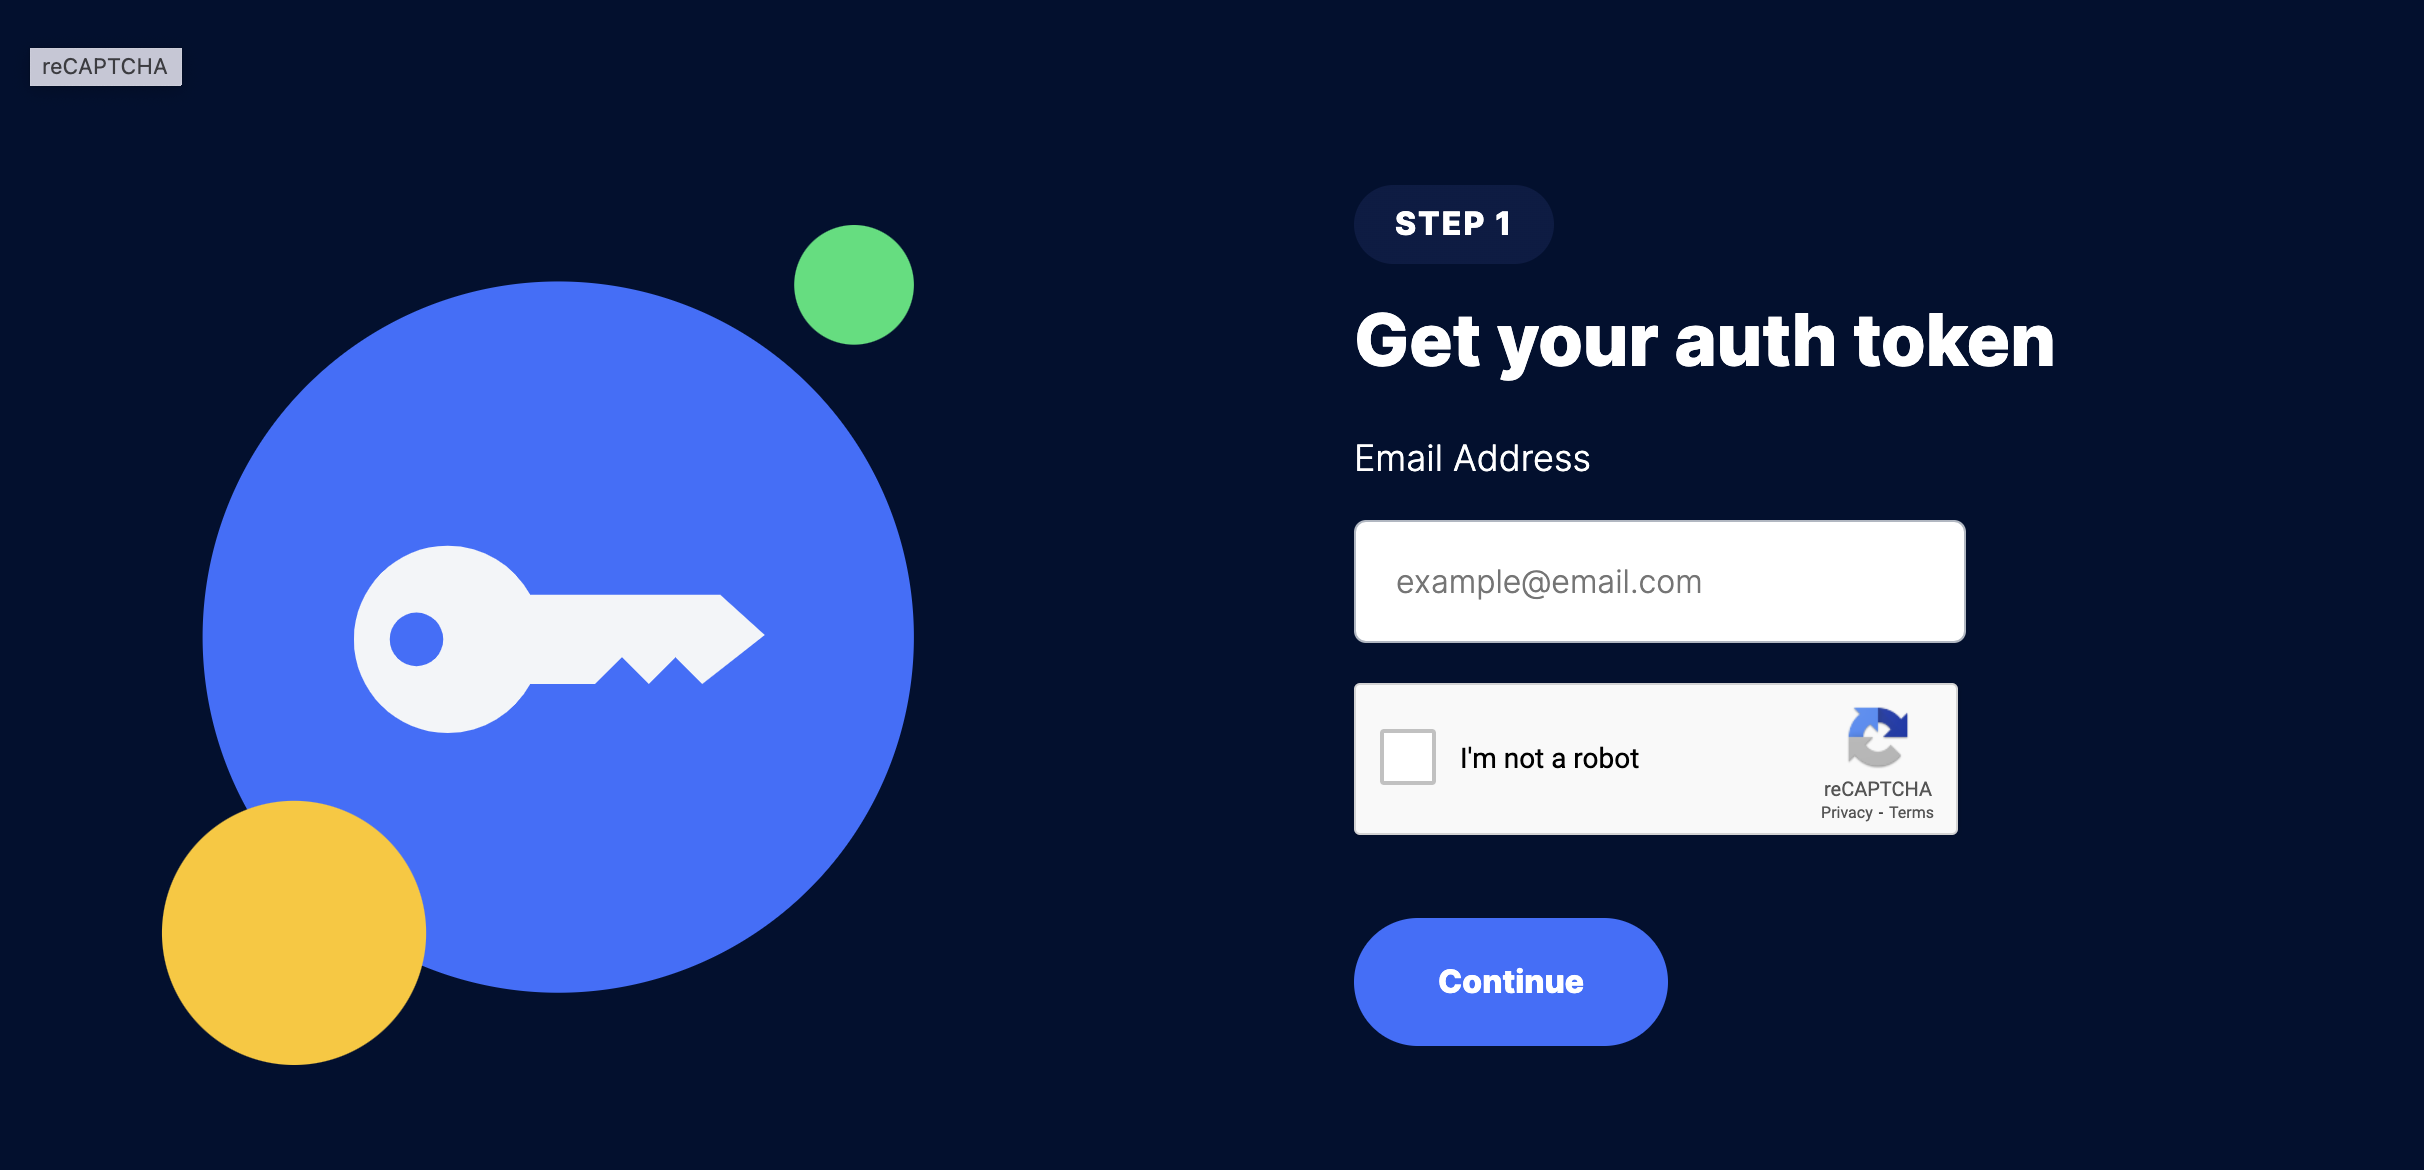
1. Get Auth Token
Go to https://www.storj.io/host-a-node and input your email and to generate auth token.
If you want to setup multiple node use one email address, please complete setup a node before generate auth token for another node, if not, token is duplicated.
2. Create Identity for new node
Check the detail of this step at the official document: https://docs.storj.io/node/dependencies/identity
For Linux quick command:
Download identity tool
curl -L https://github.com/storj/storj/releases/latest/download/identity_linux_amd64.zip -o identity_linux_amd64.zip
unzip -o identity_linux_amd64.zip
chmod +x identity
sudo mv identity /usr/local/bin/identity
Create an Identity & authorize identity file
identity create storagenode
identity authorize storagenode <email:characterstring>
grep -c BEGIN ~/.local/share/storj/identity/storagenode/ca.cert
grep -c BEGIN ~/.local/share/storj/identity/storagenode/identity.cert
IV. Setup a Node
1.Setup new Node
Run the command bellow to setup a new node
Replace the <identity-dir> and <storage-dir> with the directory in your node
docker run --rm -e SETUP="true" \
    --user $(id -u):$(id -g) \
    --mount type=bind,source="<identity-dir>",destination=/app/identity \
    --mount type=bind,source="<storage-dir>",destination=/app/config \
    --name storagenode storjlabs/storagenode:latest
2. Run Storj Node
Option 1: Run Node with docker-compose
Create the docker-compose & .env file as the content bellow and make sure that <identity-dir> and <storage-dir> is the same value with step a bove
docker-compose.yml
version: "3.5"
services:
  storjnode:
    image: storjlabs/storagenode:latest
    container_name: storj
    ports:
      - "28968:28967/tcp"
      - "28968:28967/udp"
      - "127.0.0.1:14003:14002"
    volumes:
      - type: bind
        source: <identity-dir>
        target: /app/identity
      - type: bind
        source: <storage-dir>
        target: /app/config
    env_file:
      - .env
    restart: always
  auto_update:
    image: containrrr/watchtower:latest-dev
    volumes:
      - /var/run/docker.sock:/var/run/docker.sock
    # Update check interval in seconds.
    command: --schedule "0 0 * ? * *" --label-enable --cleanup
    restart: always
    depends_on:
      - storjnode
    environment:
      - WATCHTOWER_LIFECYCLE_HOOKS=true
  # Storj Node Exporter
  storj_exporter:
    image: anclrii/storj-exporter:latest
    restart: always
    environment:
      - STORJ_HOST_ADDRESS=storjnode
    ports:
- "9651:9651".env file
WALLET="<ERC-20 Token Address>"
EMAIL="<email-register-node>"
ADDRESS="<public-ip/domain>:28968"
STORAGE="1TB" #Storage Space
Run command
docker-compose up -d
after run this command, your node will up & run with:
- a Node container running, and serve the request on the Storj network
- Automatic update to make sure that your node is always up to date
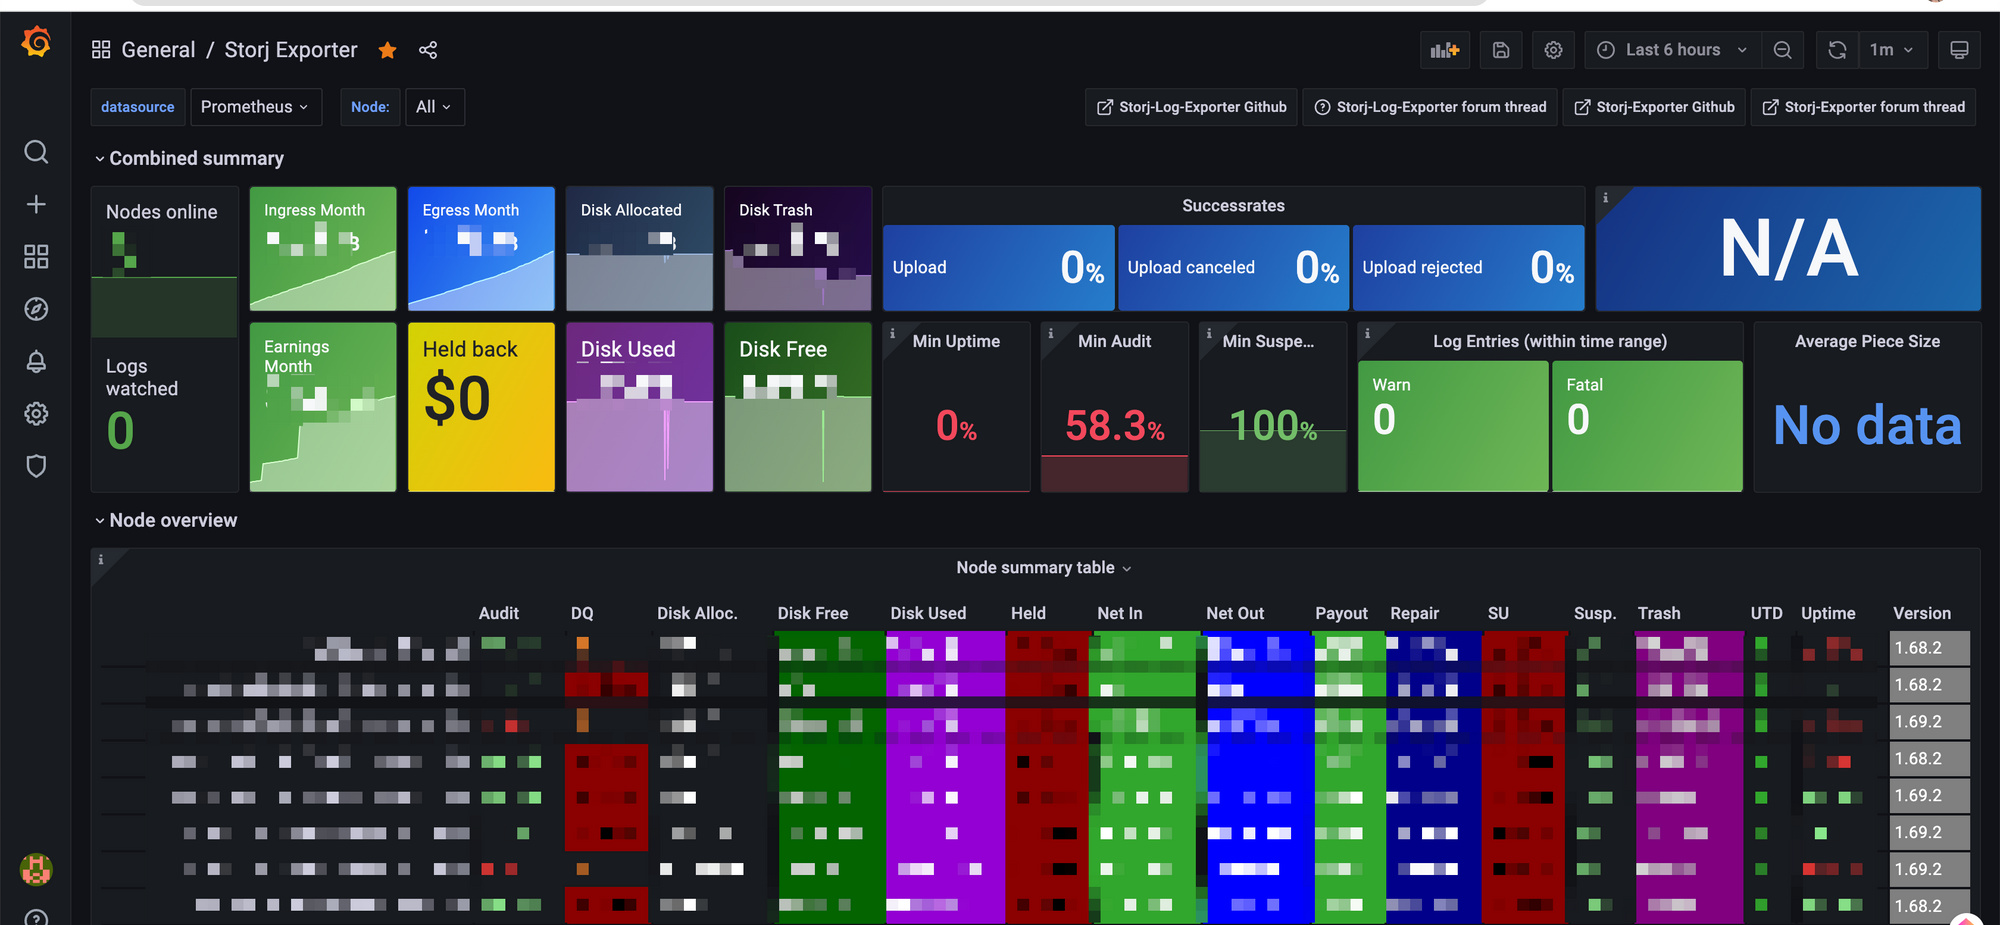
- A Storj Exporter container to export all the node metric, your can collect & visualize it on the prometheus & grafana stack
Option 2: Setup with systemd
(to be update)
3. (Optional) Monitor Storj Node with Grafana & Prometheus
- Repository to setup Grafana, Prometheus: https://github.com/stefanprodan/dockprom
- Storj Exporter Source: https://github.com/anclrii/Storj-Exporter
- Grafana Storj Exporter Dashboard: https://github.com/anclrii/Storj-Exporter-dashboard
- Prometheus Collector Config:
# prometheus.yml
global:
  scrape_interval:     15s
  evaluation_interval: 15s

# A scrape configuration containing exactly one endpoint to scrape.
scrape_configs:
  - job_name: storj
    scrape_interval: 60s
    metrics_path: /metrics
    static_configs:
      - targets: ['<node-ip>:9651']
4. (Optional) Monitor Storj Node Uptime with use Uptimerobot
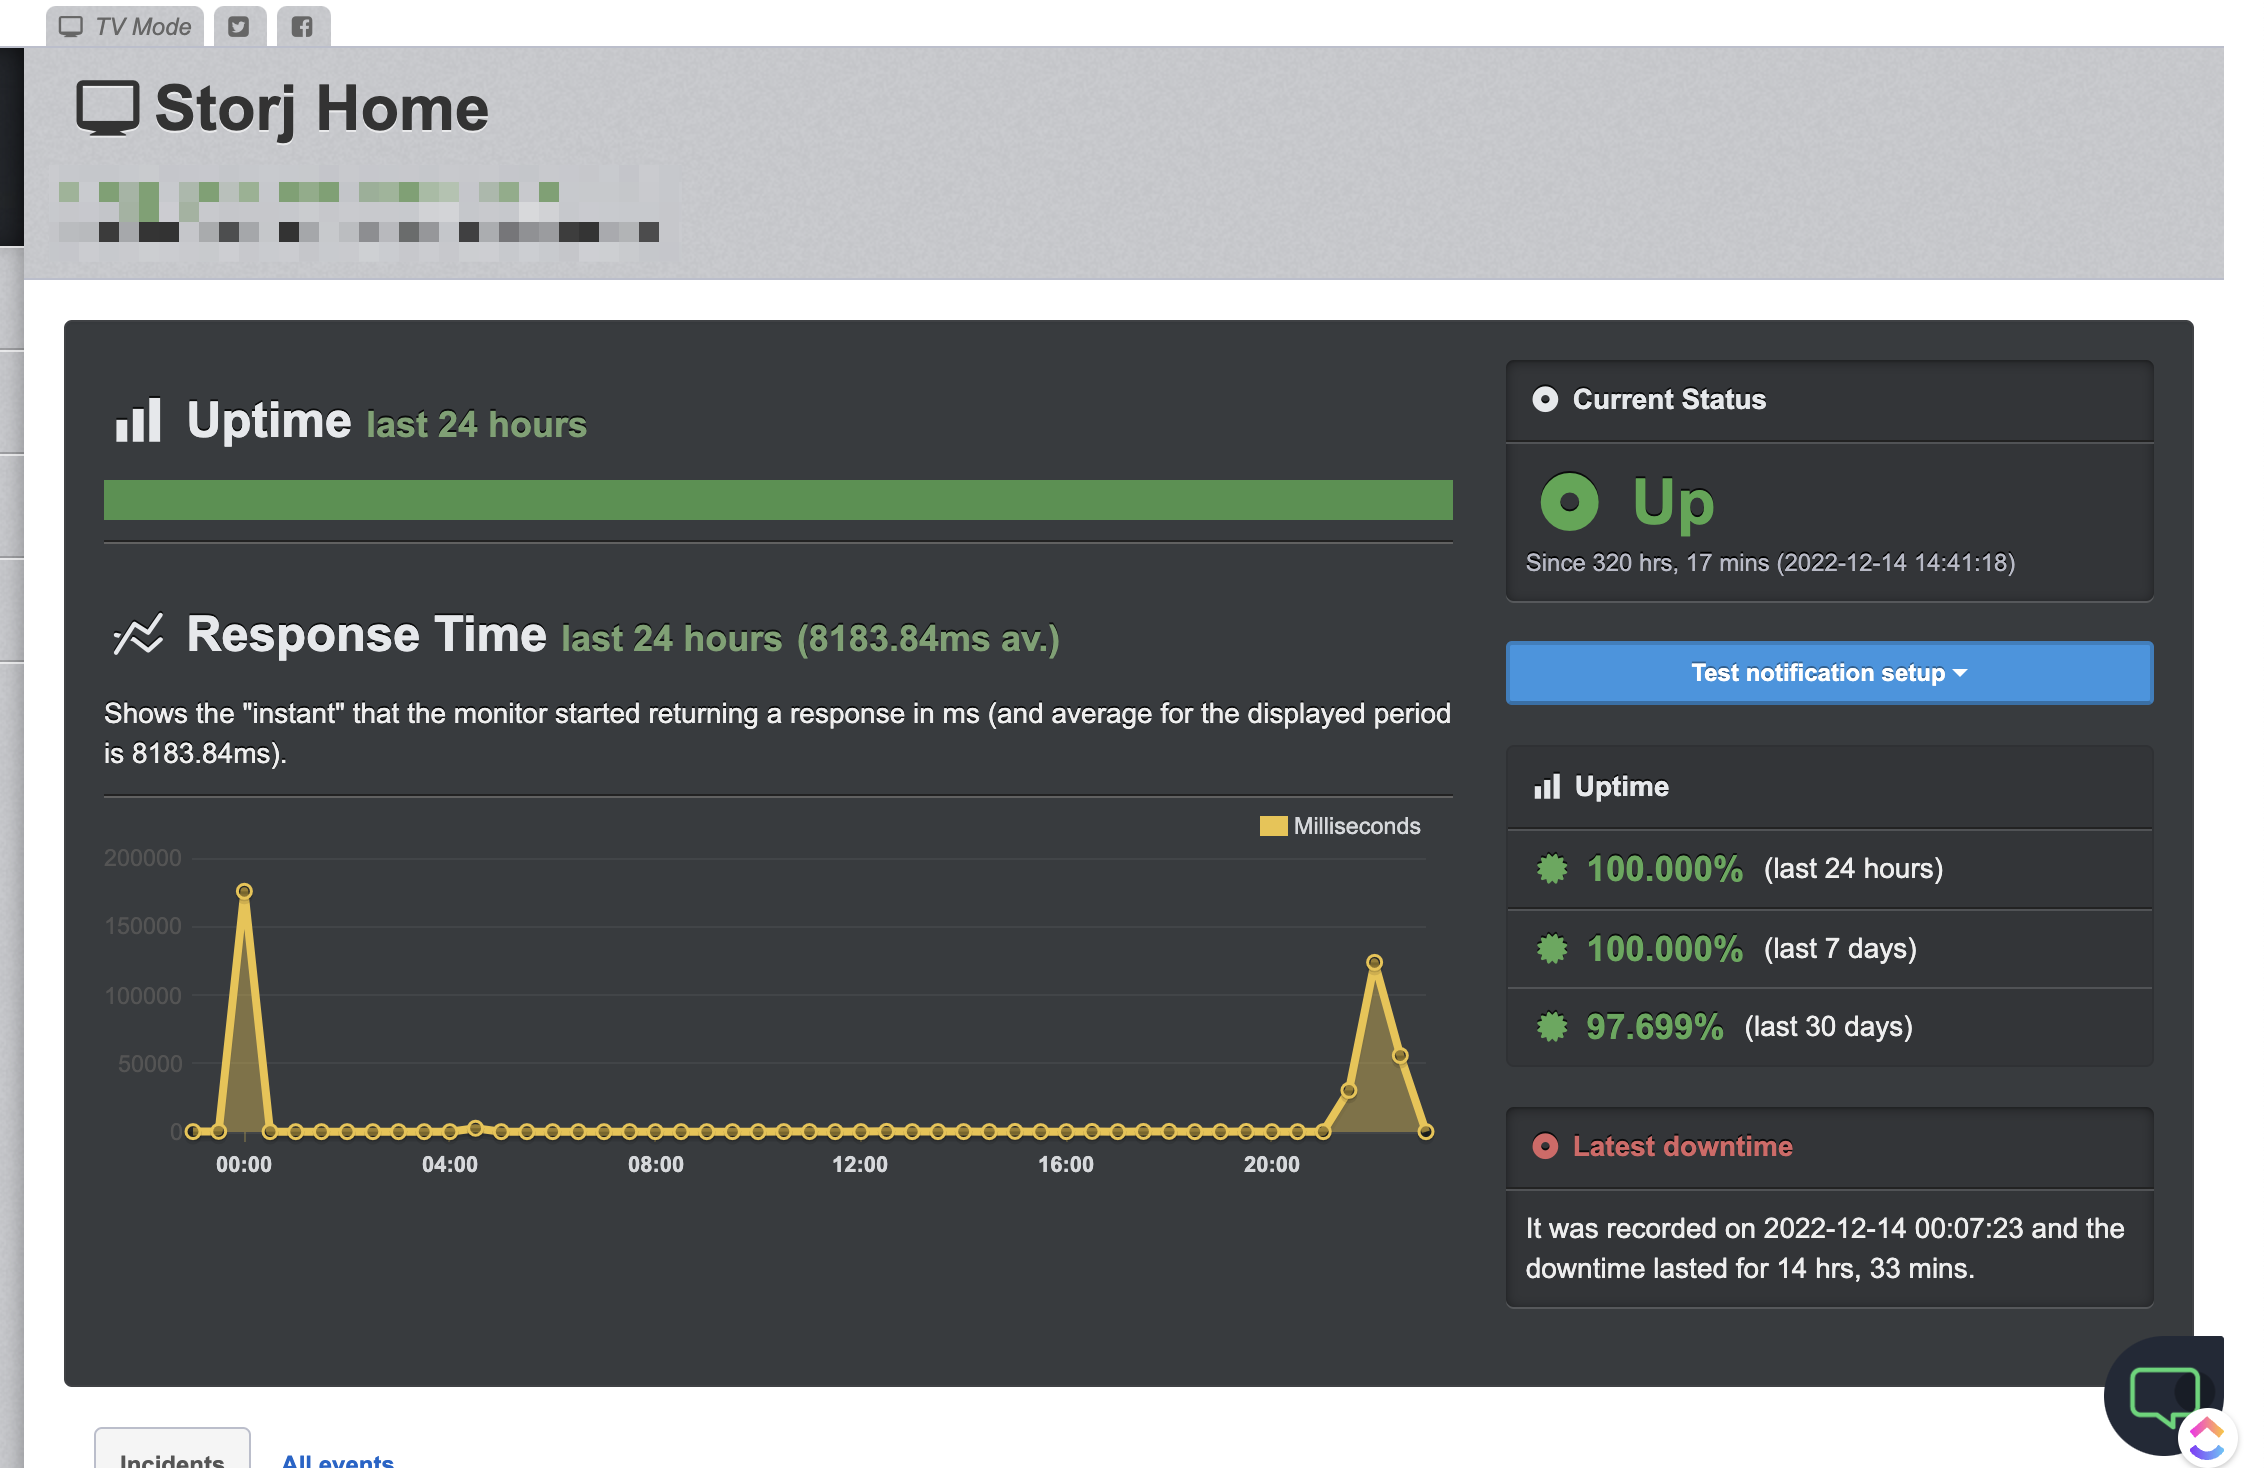
Another option to monitor & receive alert if your node is down with Uptime Robot by monitoring port 28967, but this approach can only help you receive the alert if node down, No any additional metrics is collect with this approach
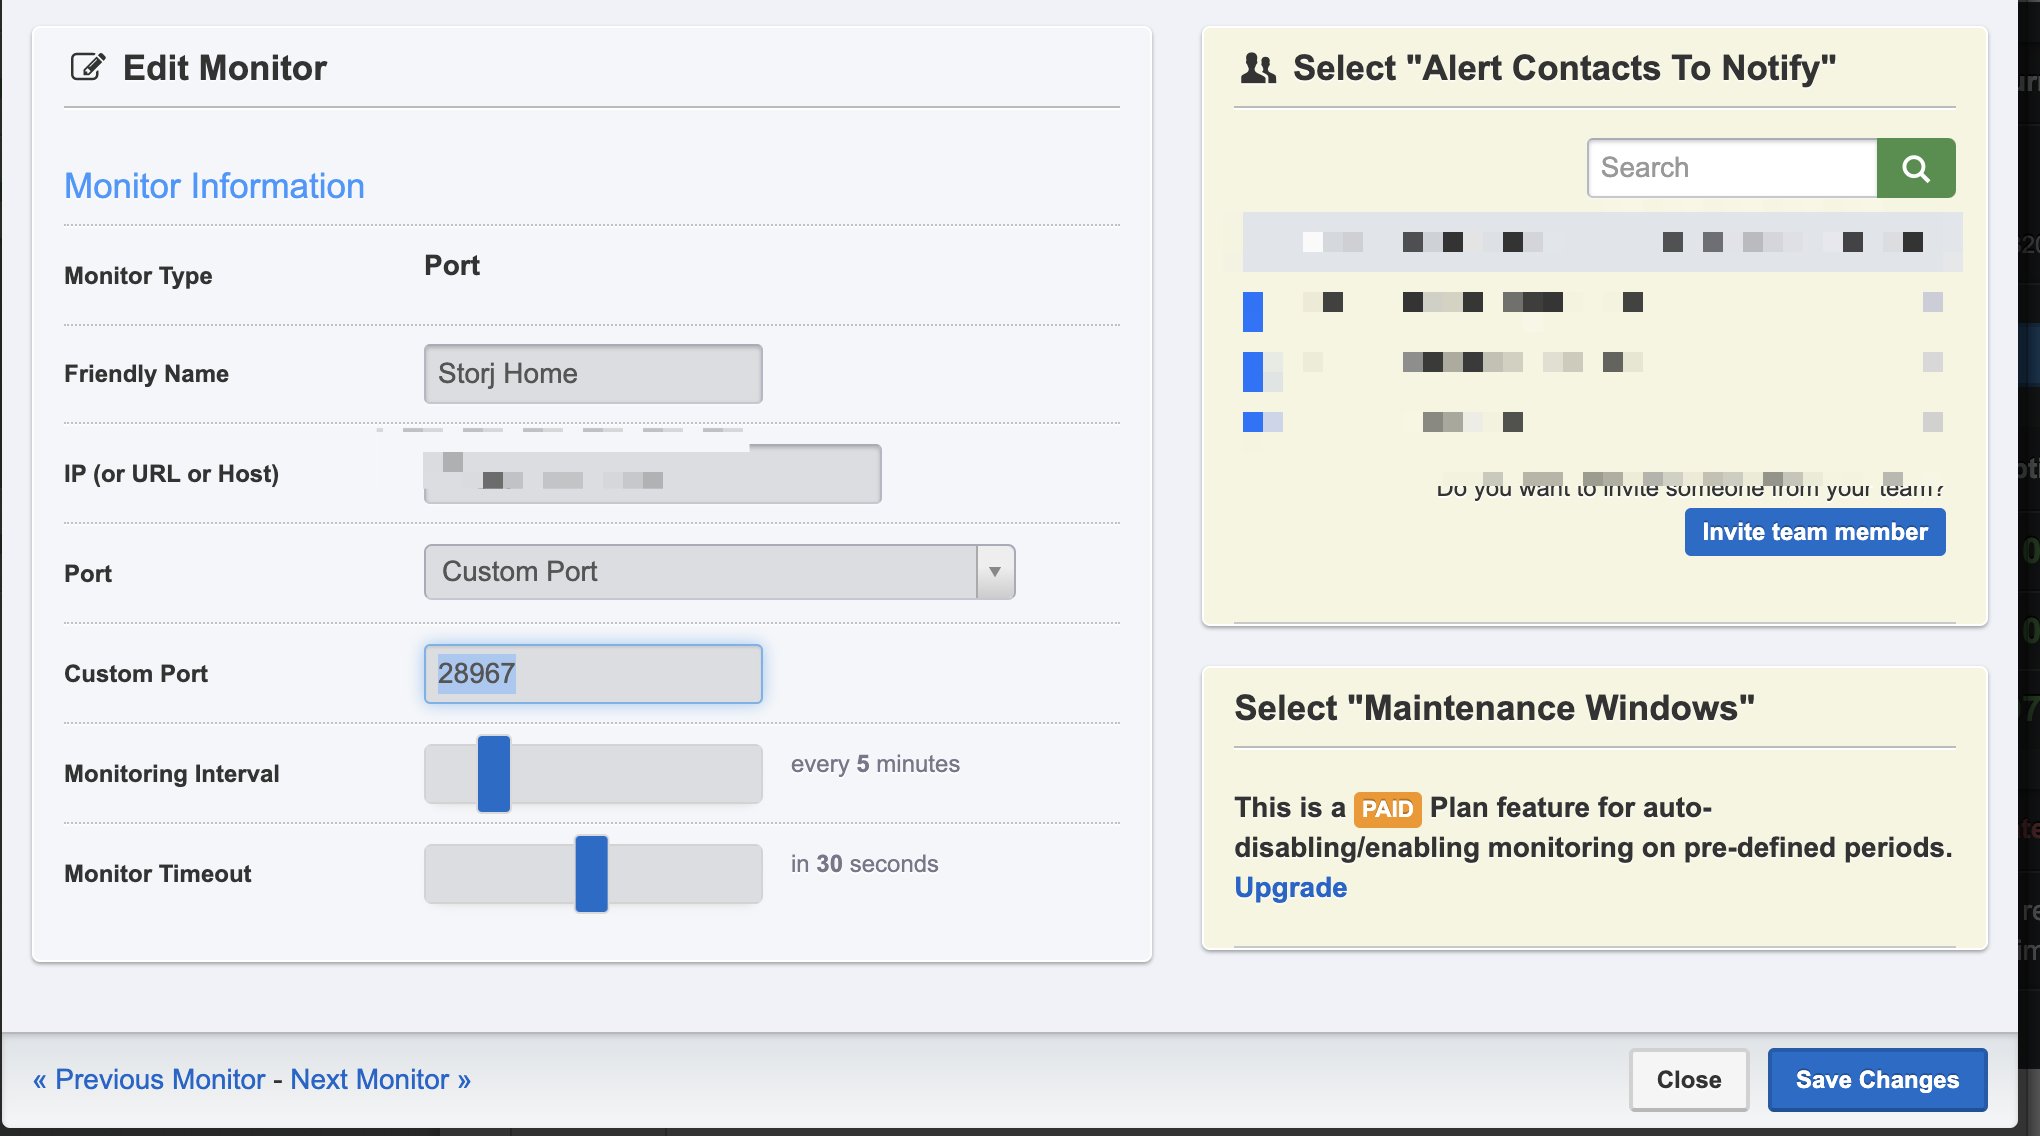
For the detail guide to setup, please check my solution to monitor the