Blog development series - Backup Ghost Blog with Storj
TLDR; This is a series of post-recording & sharing the progress setup of my blog from the beginning of development to meet the needs for stable and reliable blog operation
Series
- Blog development series - Setup MVP Blog with Ghost and Docker
- Blog development series - Setup health check Ghost Blog with Uptime Robot
- Blog development series - Backup Ghost Blog with Storj
I. Context
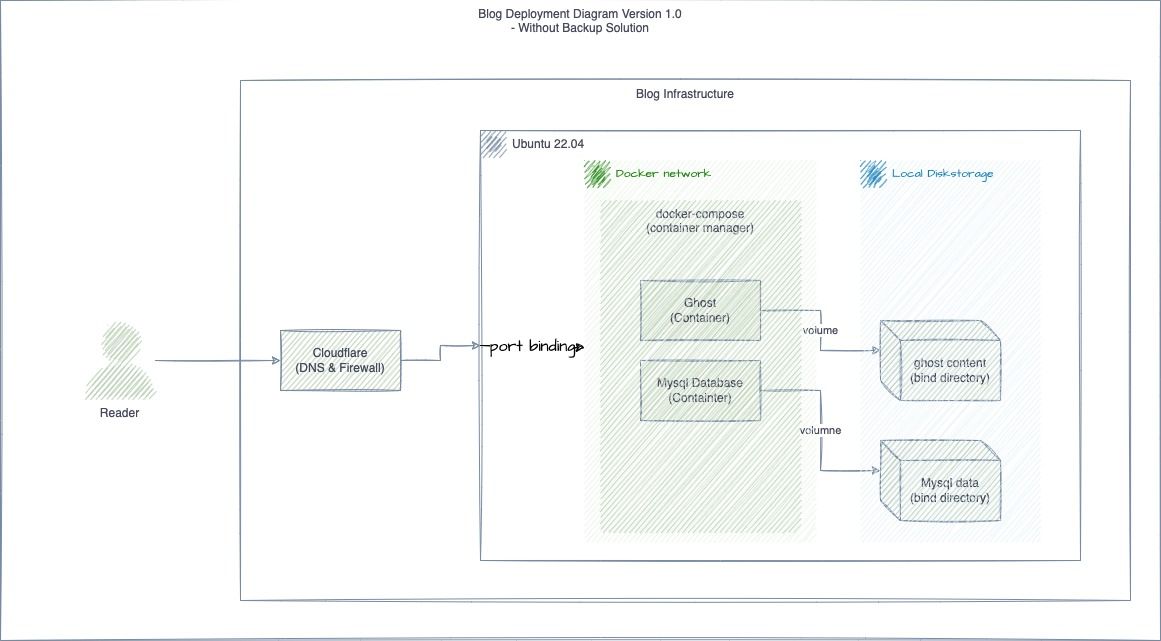
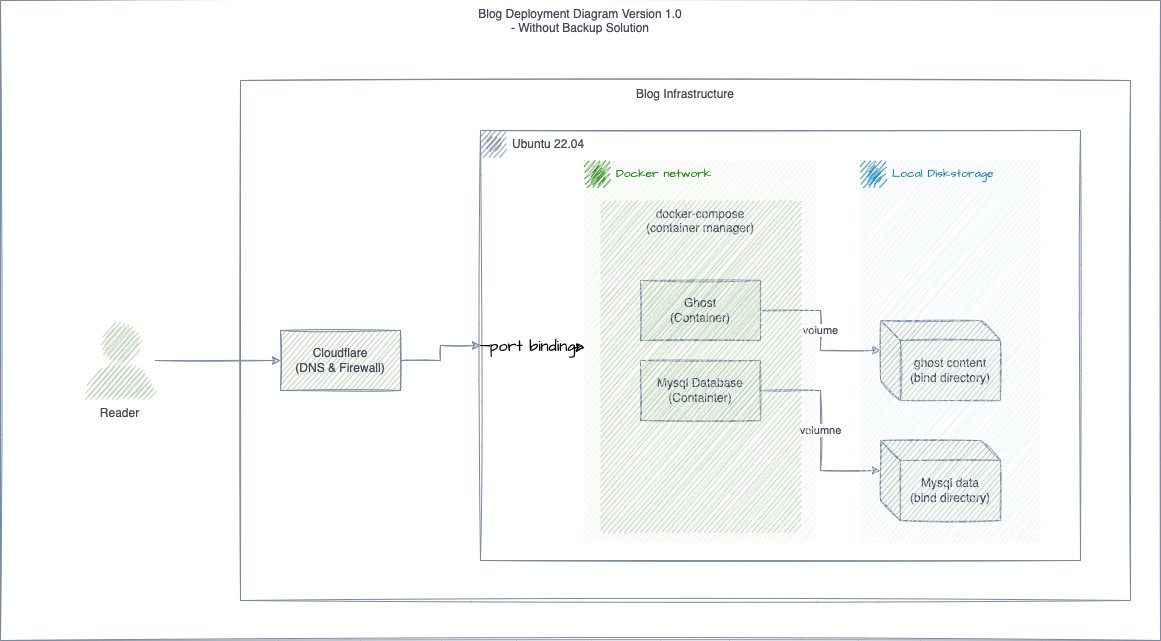
This blog is a simple monolithic application deployed with docker & managed by docker-compose running 2 containers: Ghost 5.3 & Mysql 8.0 as the diagram bellow
Why we need backup the data?
The world is divided into 2 types of people, one who has backed up the data and the other who will the backup data
Data backup is an important and urgent task that any data system must have to ensure that we have the opportunity to preserve our data in the event of any failure. happen (hacked, ransomware, hardware-corrupted, human mistake, ...)
II. Backup Ghost blog using Bash script and Storj
Why Storj?
- I want to use Storj DCS as a storage solution for backup tool so that I can test the effectiveness of Storj DCS by myself and I am also a Storj Node Operator so I want to have the most complete view from both sides users and node operator.
- If you don't want to use Storj, you can choose any remote source that Rclone support: S3, S3 compatible solution ( MINIO, Filebase), Google Drive, check more at: https://rclone.org/overview/
Why Bash?
- Just Simple, Bash is the glue to connect everything & it a great tool for interactive in command line environment
What should I backup?

Two things:
- Ghost content /content: which includes my blog content in JSON, member CSV export, images, themes and some configurations
- Database: major blog database,
- (Optional) Application Versioning, docker-compose file
Overview step to backup:
- Register an account & setup new bucket on Storj
- Install some requirements tool: Rclone, Restic
- Setup Restic repo to work with Rclone and Storj
- Implement backup script
- Copy & Zip Ghost Blog Content
- Export Database to sql or sql.gz file
- Backup content to remote destination with Restic & Reclone
- Setup Schedule for automation Backup
- Prepare recovery Plan & rehearsal for restoration
III. How to setup backup use Storj and Bash script
Step 1. Create an account & setup new bucket on Storj
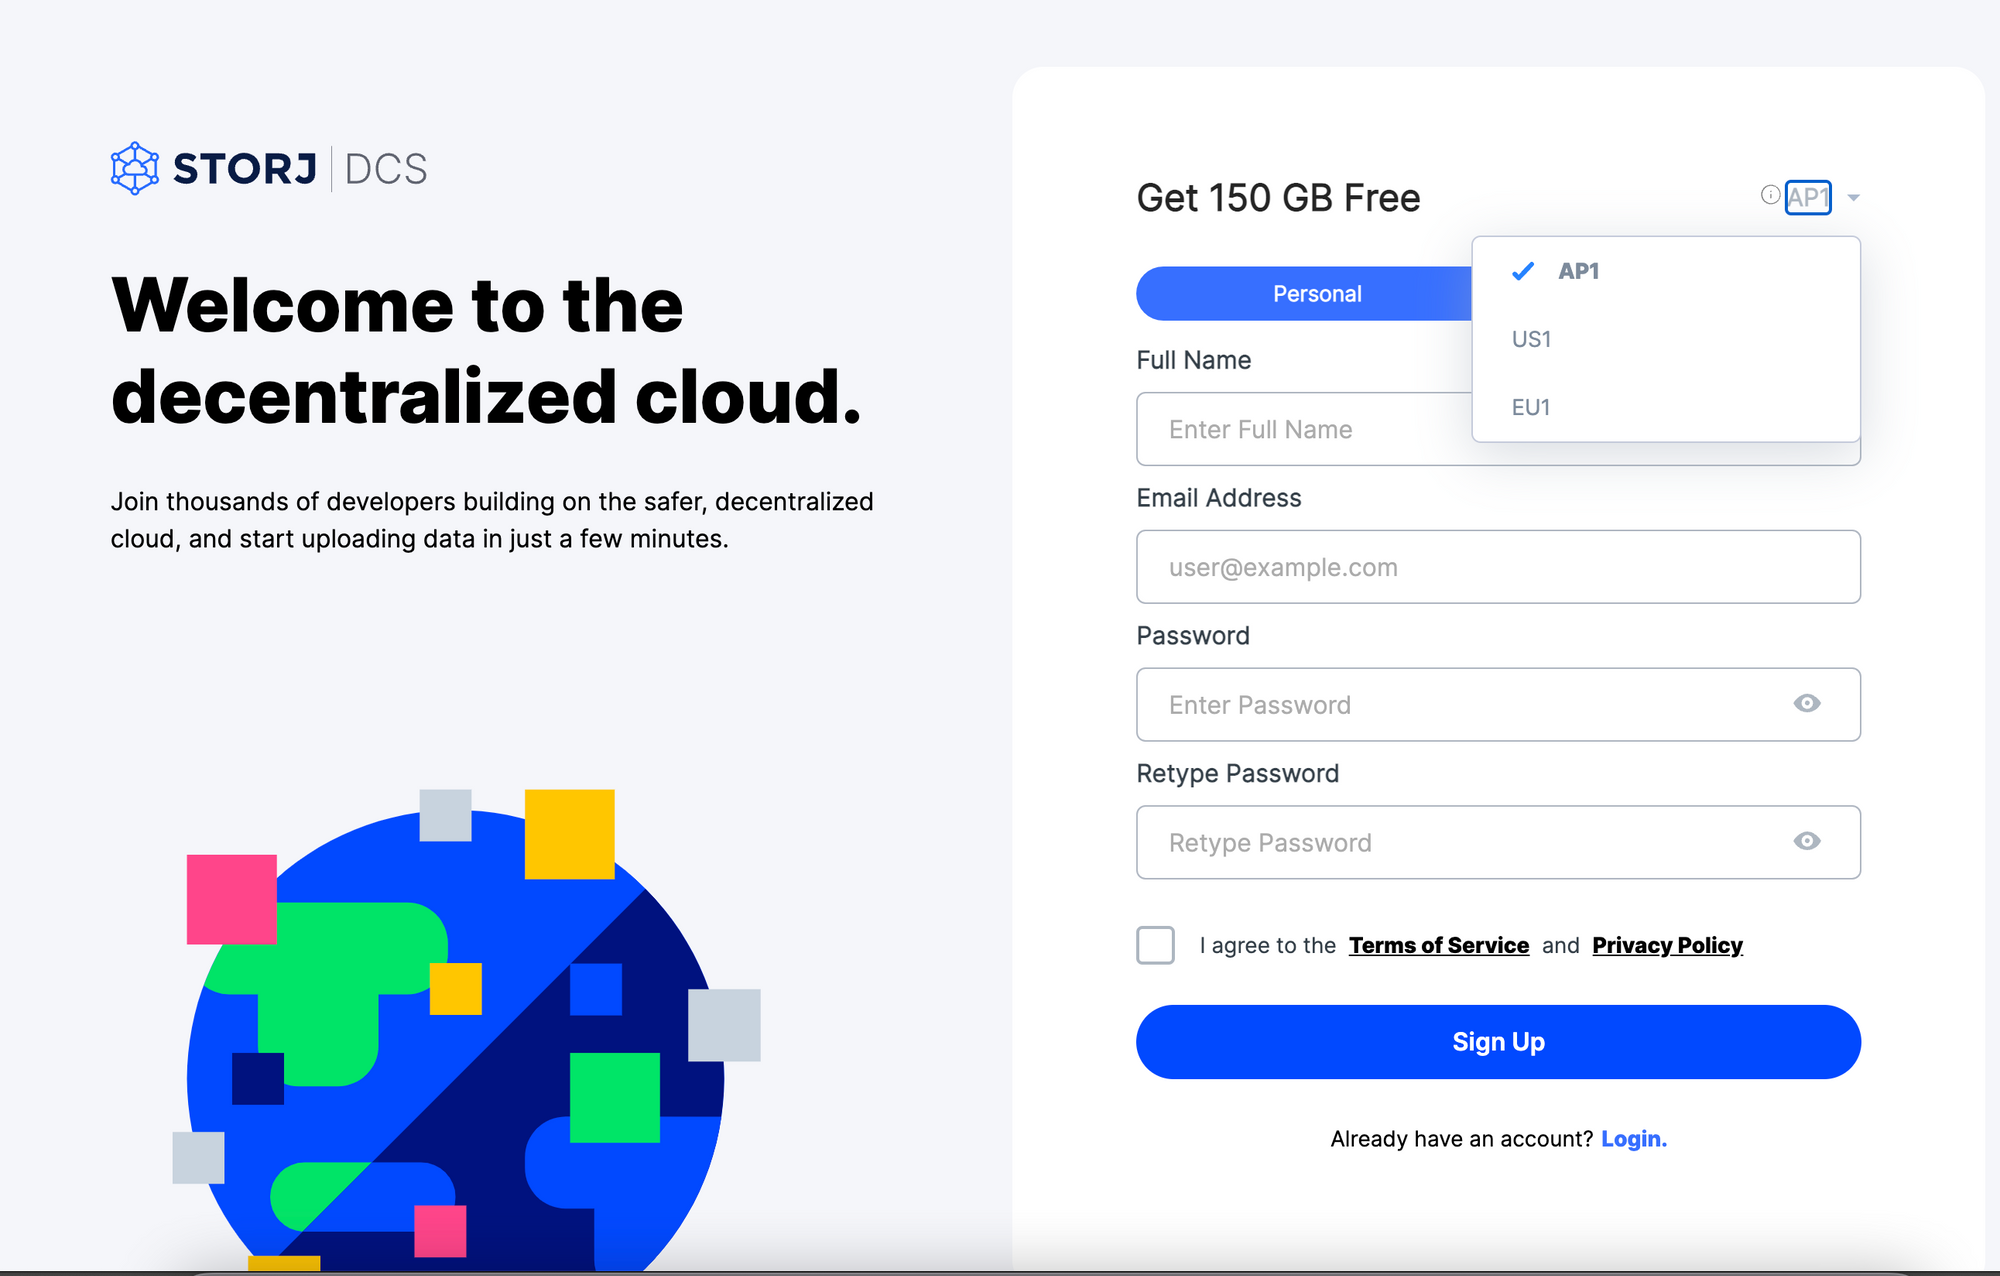
First one, register new account on Storj and create new bucket to storage backup content.
Register new account: https://www.storj.io/
Currently, Storj is free 150GB for each account after register ( 3 project & 50GB for each project). It enough for me to storage backup data right now.

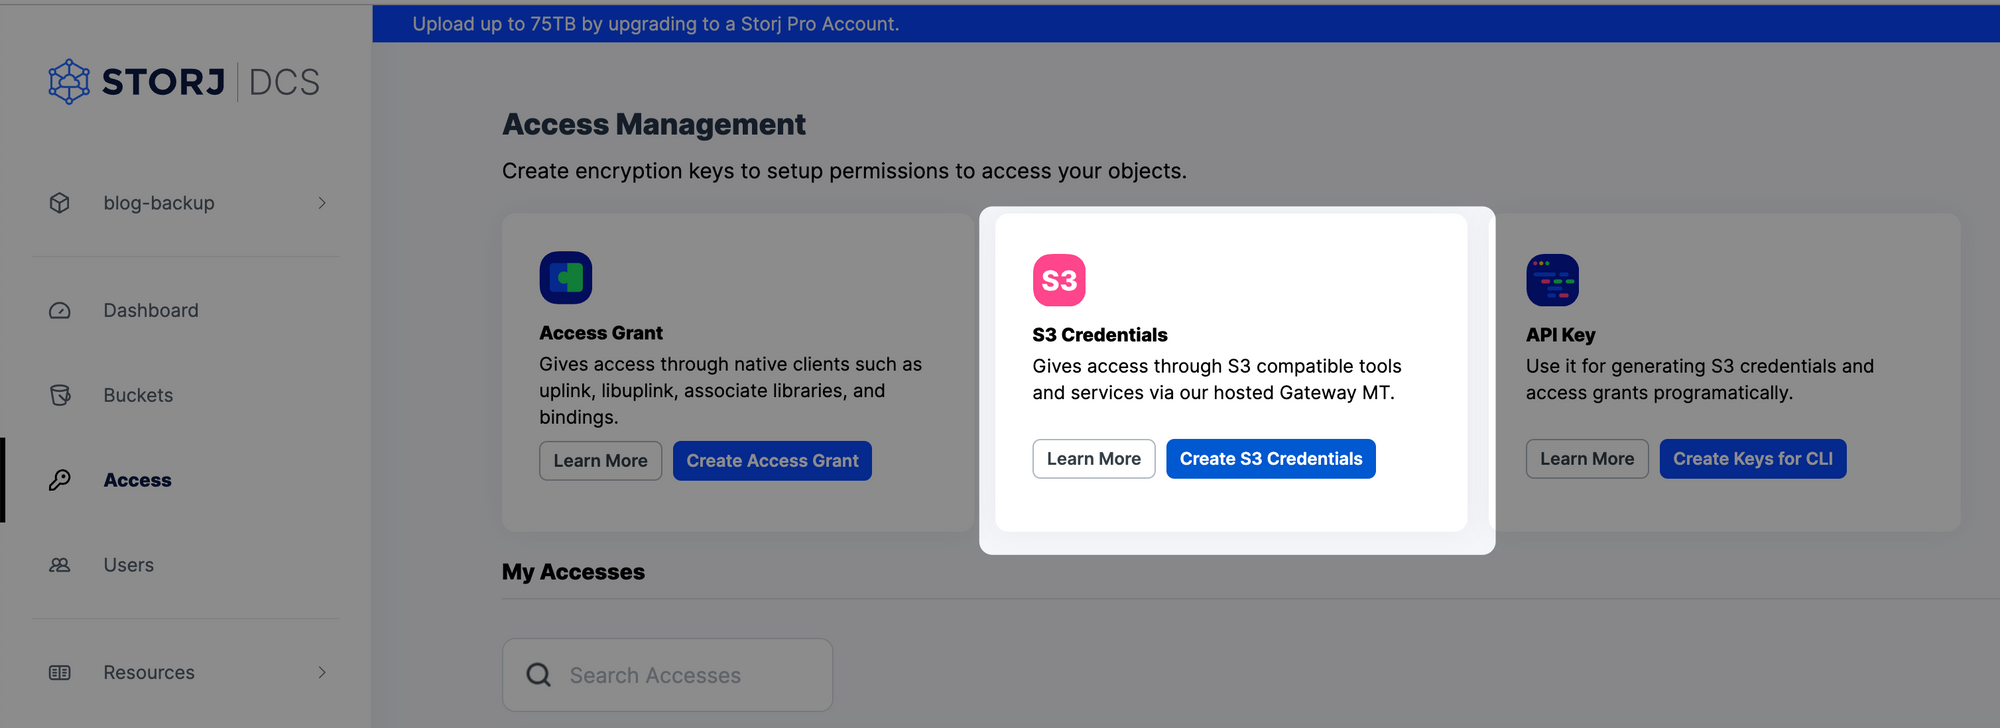
Create new S3 Credential:
Storj DCS provide a S3 compatible Gateway MT to help us use it with S3 Interface, so we'll create a new Credentials and setup Rclone to use it.
For detail: https://docs.storj.io/dcs/api-reference/s3-compatible-gateway
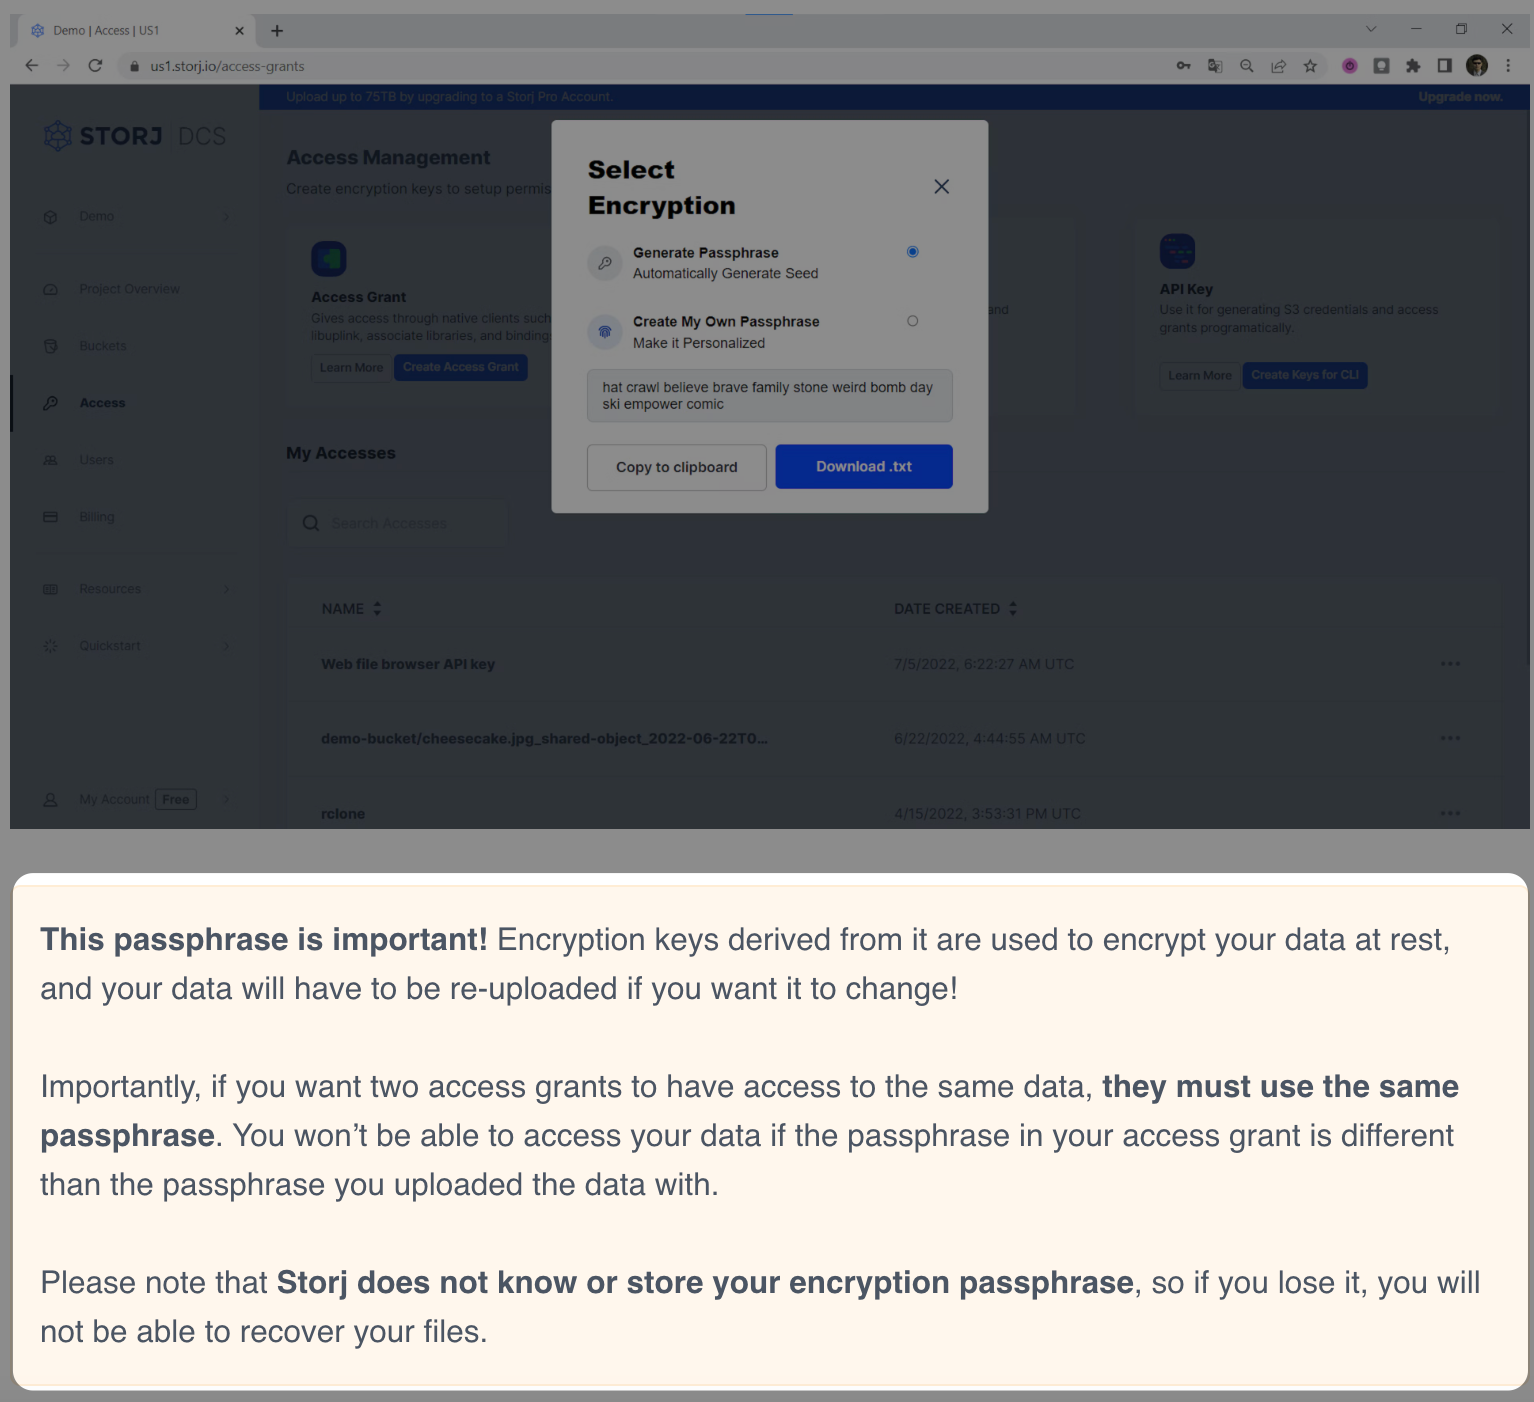
The important note here is: write down & storage your passphrase carefully, if you lost it, you may lose your data permanently because the data you upload on Storj will be encrypt & spit to small piece before distribution one storage nodes ( read more at: How Storj Works)
Step 2: Install requirements tools
Install Rlone & Restic
For Ubuntu based:
sudo apt install -y rclone resticFor Linux Distro, please check:
- Rclone: https://rclone.org/install
- Restic: https://restic.readthedocs.io/en/stable/020_installation.html
Step 3: Setup Restic repo to work with Rclone and Storj
Config Rclone sync files to Storj bucket
For shortcut: create new rclone config and put it in: $HOME/config/rclone/rclone.conf with the content bellow
[storj]
type = s3
provider = Other
env_auth = false
access_key_id = <s3-credential-access-key-created-in-step-1>
secret_access_key = <s3-credential-secret-access-key-created-in-step-1>
endpoint = https://gateway.storjshare.io
acl = private
chunk_size = 64MFor detail guide: https://docs.storj.io/dcs/how-tos/sync-files-with-rclone/rclone-with-hosted-gateway
Init new Storj Bucket with rclone
rclone mkdir storj:my-backup-bucketInit Restic Repo
# Init Restic repo
restic --repo rclone:storj:my-backup-bucket/blog-backup init
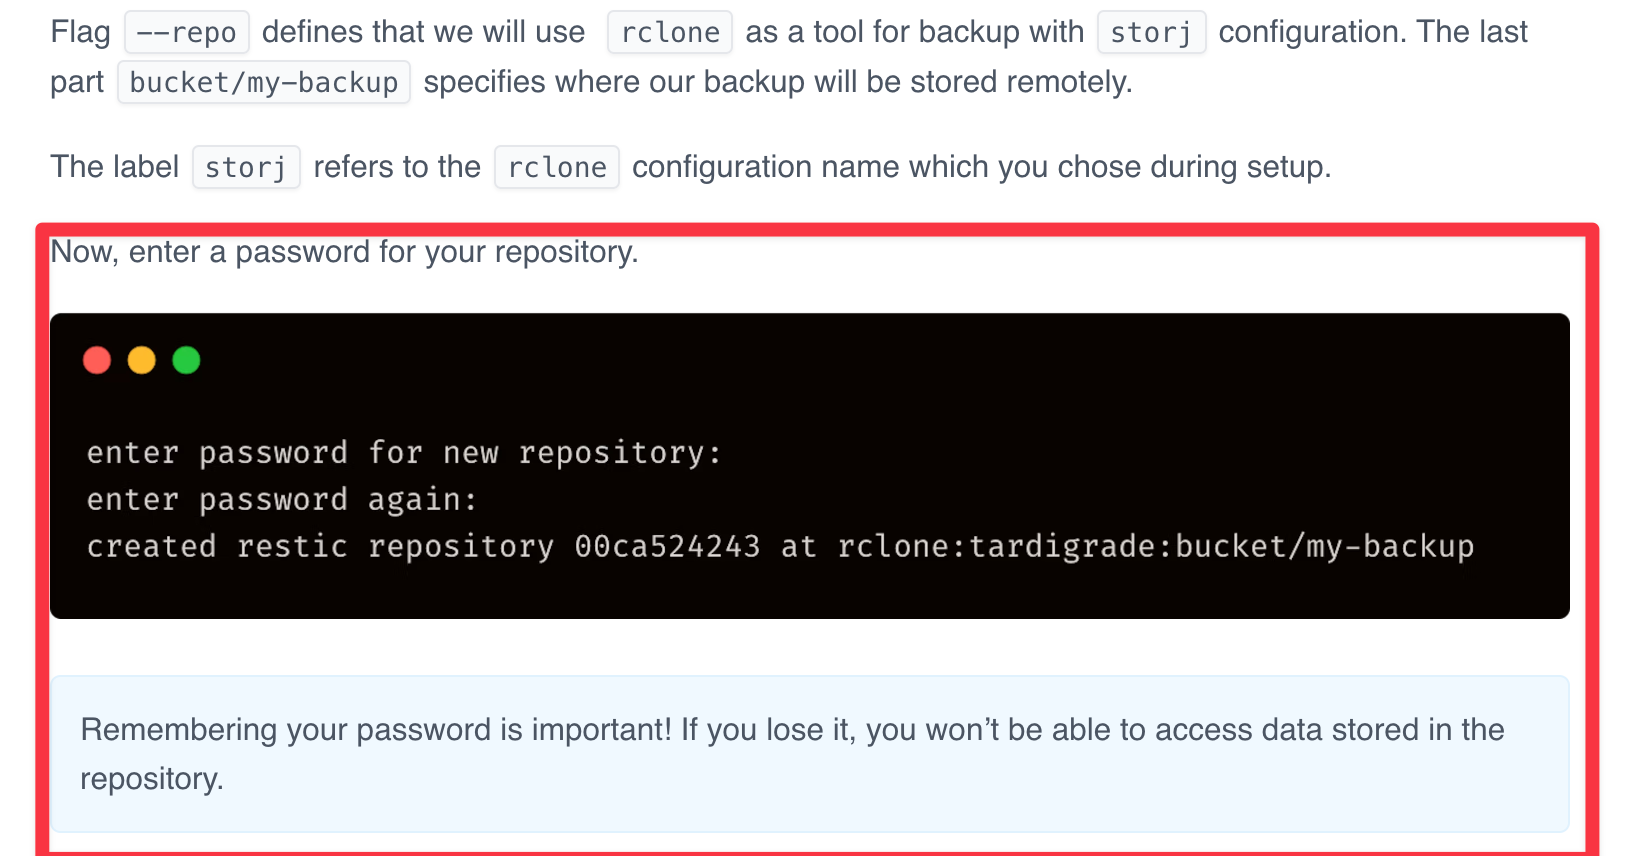
For detail guide: https://docs.storj.io/dcs/how-tos/backup-with-restic
Step 4. Implement the backup script
- Create a folder and import application environment into current shell
This just a temporary folder to collect everything before store it into Storj Bucket
# Create temporary folder
DAY=$(date +%A)
FULLDATE=$(date -I)
BACKUP_DIR=/tmp/backup/blog-backup-$FULLDATE
# Create temporary backup directory
mkdir -p $BACKUP_DIR
Import current .env config: this will help we load all current configuration ( database username, password, database name) into the current shell.
# Import current .env config
. .env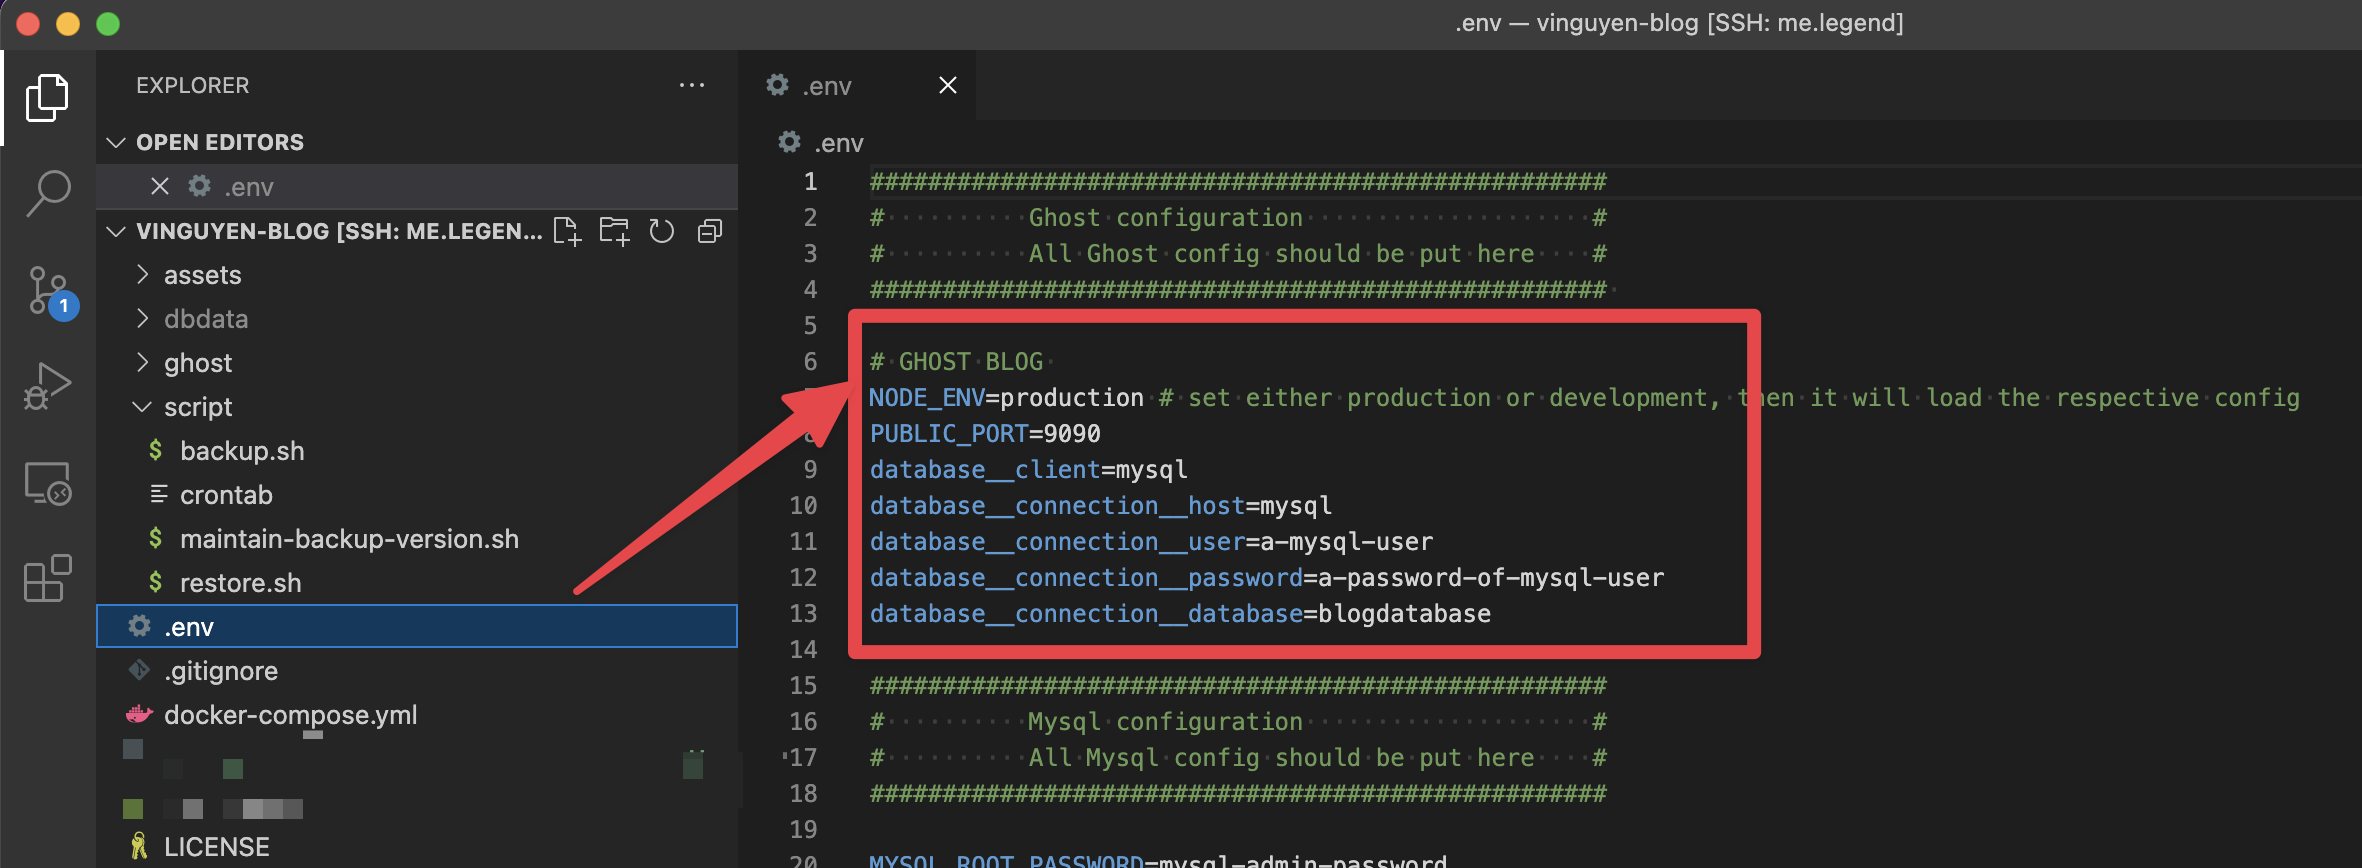
2. Copy & Zip Ghost Blog Content
Go to blog deployment repository then archive the ghost folder, it contain all most important information of our blog
tar -zcvf $BACKUP_DIR/ghost-content.tar.gz ghost3. Export Database to sql or sql.gz file
General command to export database from a Mysql container:
docker exec <mysql-containername> /usr/bin/mysqldump --no-tablespaces -u <db-user> --password=<db-password> <ghost-blog-database-name> > $BACKUP_DIR/blog-db.sqlIn case that the setup following my blog development series, the variable is loaded from .env file, so we can use this command with pre-fill enough information
docker exec blog_database /usr/bin/mysqldump --no-tablespaces -u $database__connection__user --password=$database__connection__password $database__connection__database > $BACKUP_DIR/blog-db.sql4. Backup docker-compose & .env file
(Optional) In case that the setup following my blog development series
cp docker-compose.yml $BACKUP_DIR/
cp .env $BACKUP_DIR/env
5. Backup content to remote destination with Restic & Rclone
General command:
restic --repo rclone:<s3-compatible-config-name>:<bucket><folder> backup $BACKUP_DIRIn case that the setup following my blog development series
- Make sure that RESTIC_BACKUP_REPO & RESTIC_PASSWORD_FILE declared on .env file

- Create a file at the path $RESTIC_PASSWORD_FILE and put the Restic repo password into that file
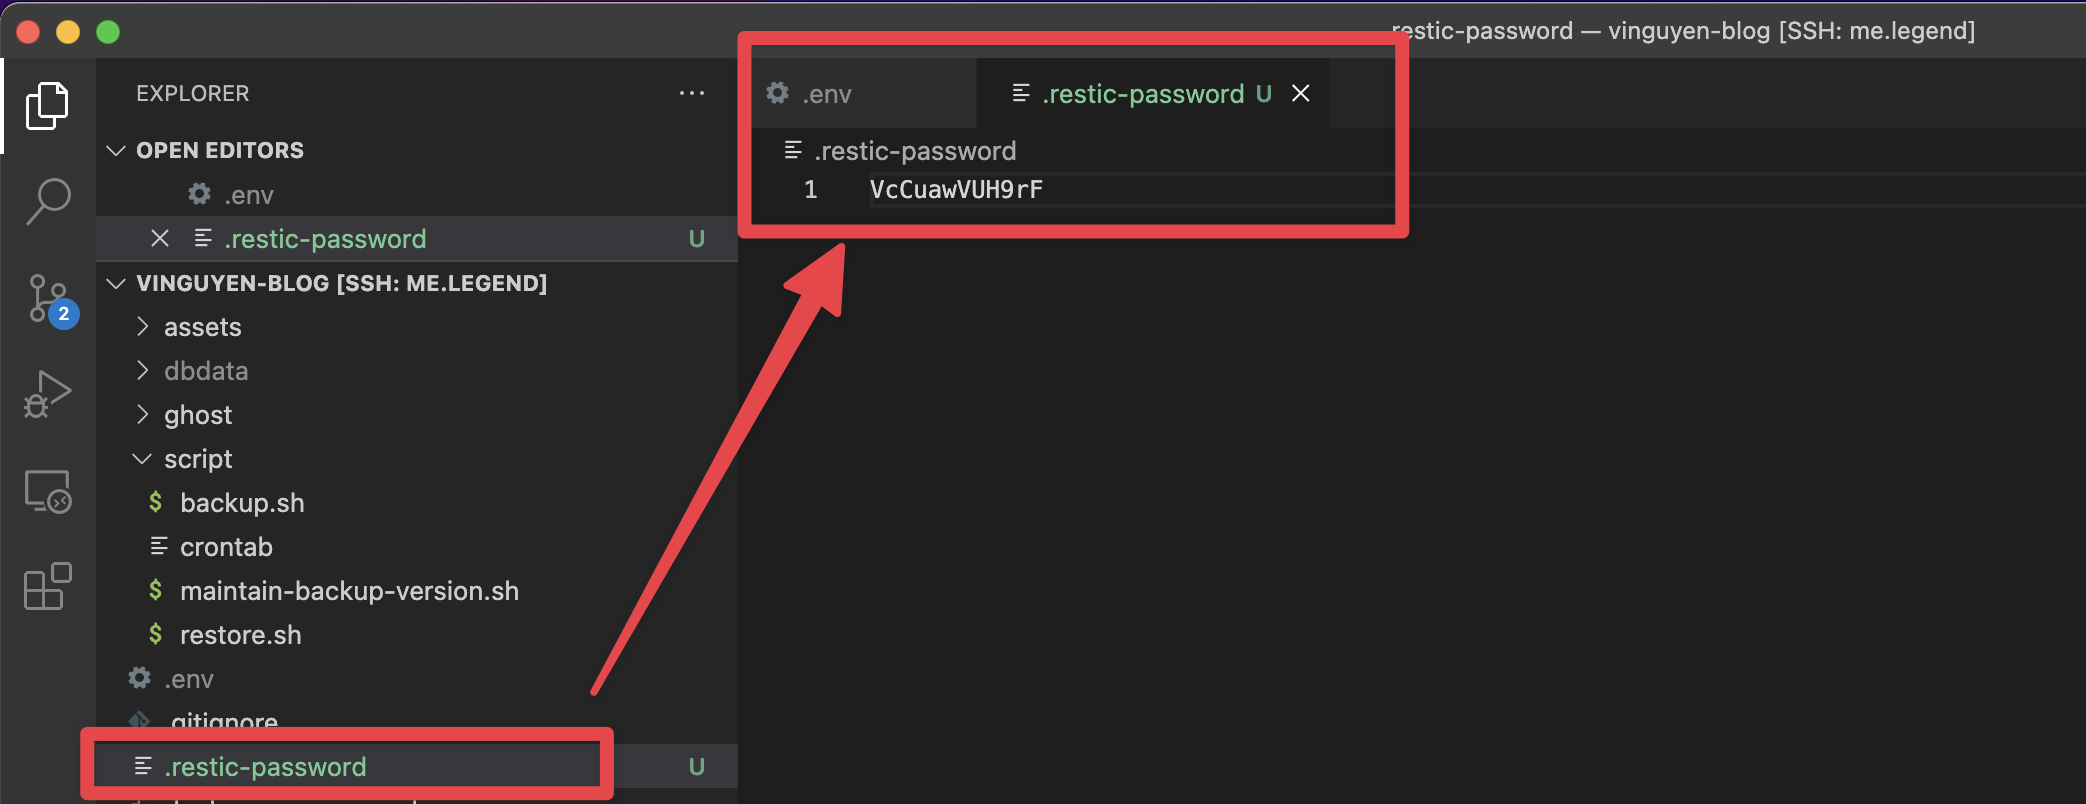
- Run the command bellow to backup
restic --password-file=$RESTIC_PASSWORD_FILE --repo $RESTIC_BACKUP_REPO backup $BACKUP_DIR6. Wrap-up into bash script
#!/bin/bash
set -e

echo "#########################################################################"
echo "# BACKUP GHOST BLOG - `date +%A` - `date +%Y-%m-%d_%Hh%Mm%Ss`          #"
echo "#########################################################################"

# Import application configuration
. ../.env

# Declare variables
DAY=$(date +%A)
FULLDATE=$(date -I)
BACKUP_DIR=/tmp/backup/blog-backup-$FULLDATE
# Create temporary backup directory
mkdir -p $BACKUP_DIR

# Extract Mysql Database
# https://anothercoffee.net/how-to-fix-the-mysqldump-access-denied-process-privilege-error/
echo "Backing up database "
docker exec blog_database /usr/bin/mysqldump --no-tablespaces -u $database__connection__user --password=$database__connection__password $database__connection__database > $BACKUP_DIR/blog-db.sql

# Copy Ghost Blog Content Driectory
echo "Backing up Ghost Data directory..."
tar -zcvf $BACKUP_DIR/ghost-content.tar.gz ../ghost


# Copy docker-compose & application configuration
echo "Backing docker-compose & application configuration..."
cp ../docker-compose.yml $BACKUP_DIR/
cp ../.env $BACKUP_DIR/env

# Backup data to  Storj bucket
echo "Backing data to Storj bucket"
restic --password-file=$RESTIC_PASSWORD_FILE --repo $RESTIC_BACKUP_REPO backup $BACKUP_DIR

# Clean up temporary forder
rm -rvf $BACKUP_DIR

echo "Backup completed"
7. Verify backup status
restic --repo $RESTIC_BACKUP_REPO snapshots
enter password for repository:
repository a5cf4e77 opened successfully, password is correct
ID        Time                 Host                   Tags        Paths
----------------------------------------------------------------------------------------------------
cb5c1de7  2022-12-13 08:48:34  4aqz.l.vinguyen.blog              /tmp/backup/blog-backup-2022-12-13
----------------------------------------------------------------------------------------------------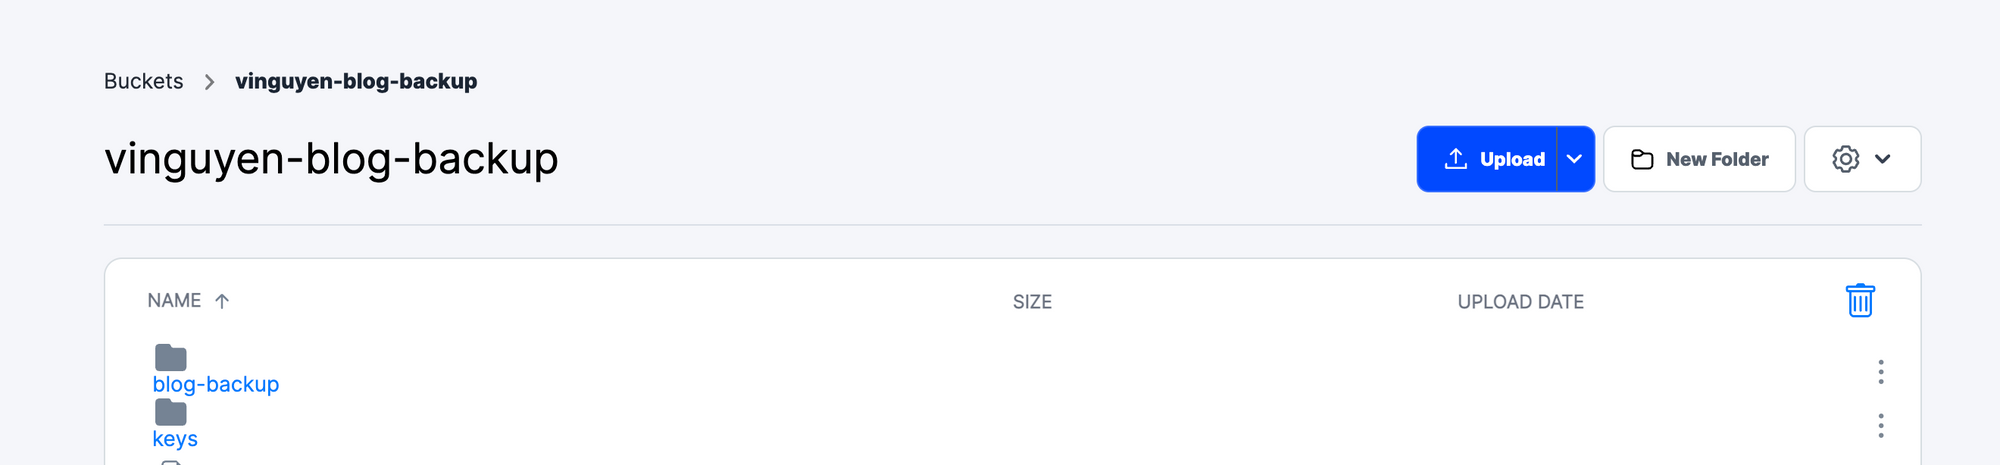
1 snapshots- Your can login into the Storj Dashboard and login into the bucket with the passphase created in Step 1 to view the file uploaded to Storj Bucket
Step 5: Setup Schedule for automation Backup
Input new rule in crontab to schedule run the backup script.
5 1 * * * <path/to/backup.sh/file 2>&1Step 6. Prepare recovery Plan & Rehearsal for restoration
In-case that we need to restore from backup, follow Step 2 and Step 3 to install rclone, restic, then config the rclone with S3
[storj]
type = s3
provider = Other
env_auth = false
access_key_id = <s3-credential-access-key-created-in-step-1>
secret_access_key = <s3-credential-secret-access-key-created-in-step-1>
endpoint = https://gateway.storjshare.io
acl = private
chunk_size = 64M
then run the restore.sh script
Restore script
#!/bin/bash
set -e

echo "#########################################################################"
echo "# RESTORE GHOST BLOG - `date +%A` - `date +%Y-%m-%d_%Hh%Mm%Ss`          #"
echo "#########################################################################"

read -p "Restore directory ( default: ./restore): " INPUT_RESTORE_DIRECTORY
read -p "Restic repository name ( rclone:<S3-bucket-compatibility>:<directory>): " INPUT_RESTIC_BACKUP_REPO

if [[ -z "$INPUT_RESTIC_BACKUP_REPO" ]]; then
   printf '%s\n' "Restic repository name is required"
   exit 1
fi

RESTORE_DIRECTORY=${INPUT_RESTORE_DIRECTORY:-"$PWD/restore"}
RESTIC_BACKUP_REPO=$INPUT_RESTIC_BACKUP_REPO

echo "Thanks for input, Restoring the latest backup from $RESTIC_BACKUP_REPO into $RESTORE_DIRECTORY ..."
restic --repo $RESTIC_BACKUP_REPO restore latest --target $RESTORE_DIRECTORY

echo "Re-create running environment"
mv -f $RESTORE_DIRECTORY/tmp/backup/blog-backup-*/* $RESTORE_DIRECTORY
mv $RESTORE_DIRECTORY/env $RESTORE_DIRECTORY/.env
tar -xvf ghost-content.tar.gz .
cd $RESTORE_DIRECTORY
docker-compose up -d
sleep 20 # Waiting for application boot
. .env
cat blog-db.sql.sql | docker exec -i blog_database /usr/bin/mysql -u $database__connection__user --password=$database__connection__password $database__connection__database

echo "Restore completed, please check your blog up and run at: http://localhost:$PUBLIC_PORT"
Conclusion
- With this approach, your blog data is safe and recoveriable.
- Three things need to save at the safe place to make sure that you restore the data
- 1) Storj S3 Credential
- 2) Storj S3 Passphase
- 3) Restic Repo Password
On the next post, I'll do some improvement to help us monitor schedule ( crontab) and a backup policy to help us maintain the versioning of backup better